Showing posts with label gingerbread. Show all posts
Showing posts with label gingerbread. Show all posts
Wednesday, December 22, 2010
Beast - {Gingerbread House}
Considering the amount of baking I do, it probably comes as no surprise that I've made a lot of mistakes in the kitchen. Extremely loose custards, flaming cupcakes, charred pies, under-baked cakes, painfully dry cookies, crumbly fudge, exploding dough and hopelessly burned sugar - I've been through it all. I've experienced the acrid smell of such mistakes time and time again, and felt hours of

Friday, December 17, 2010
New York Cupcakes

This past week, my roommate and I had the amazing opportunity to visit New York City. And no vacation is complete without eating some delicious cupcakes!
In this case, we checked out the bakery Crumbs, which is so popular, that they have multiple locations, including the Newark airport, and are even expanding to DC. Joy and I happened to go to the store by the New York Public Library (which was also amazing, but I'm also a book nerd, not just a cupcake nerd!)
It was difficult to decide which cupcake to buy, because they all looked amazing (and huge!!) but we picked Gingerbread because it was festive and not minty (*somebody* doesn't like mint. Weird).
Let me tell you. That gingerbread cupcake was fabulous. It was so rich and decedent with the fluffiest icing, which was sweet but not too sweet. And the cake part? Oh. My. God. So moist. So flavorful. So spicy and gingerbread-y. The only problem was that there was no way I'd be able to eat a whole cupcake all by myself. So it's good that Joy and I split it. They're really messy and crumby too, which is kinda funny, considering the name of the bakery is Crumbs and all! :-)

And Joy's cousin Beth also bought us gingerbread cupcakes from Bella's Bakery in NJ, which were more reasonably sized and had cream cheese icing (Mmm mm!) The cool thing about Bella's, though, is that they have nut-free cupcakes for kids with allergies and also make gluten free, vegan, and organic treats as well. I love the idea. The bakery was started because the owner's daughter is allergic to nuts and couldn't eat the cupcakes that the other kids would bring to class.
Anyway, if you're in New York or New Jersey, I would gladly recommend both Crumbs and Bella's to you if you're in a cupcake-y mood. As far as any of the other bakeries that are around, I have no doubt that they're delicious, but I just haven't tried them yet. Guess that means I have to go back!
P.S. Please don't forget to vote for me! <3
Saturday, January 9, 2010
Brownie Cupcakes

Ta-Da! Here are the finished cupcakes that I alluded to yesterday, and they are all in their entirety (unlike yesterday, when I started eating the gingerbread man before I took a picture).
Oh, wait. That guy in front looks a little crippled. Well, to be fair, they are irresistibly yummy.
 I started out with a box of turtle brownie mix that my grandma gave me, and a sleeve of 500 Christmas cupcake liners. And so, the idea of brownies that look like cupcakes was born! Plus, it was a snow day, and I was stuck inside because of the below freezing weather and icy road conditions.
Be warned, though, that the brownies stuck to the cupcake liners. Maybe it was the caramel? Or maybe I should've sprayed Pam on them first? I'm really not sure about that odd phenomenon, but if you have any ideas, let me know so I can improve next time.
Then, since I had this really cute idea in my head about snowflake sprinkles and tiny gingerbread men, I wanted to decorate them...

You can't really tell, but that's a 2-foot piping bag I've got in my hands. When I decided I needed a bigger bag to ice cupcakes with, I figured I'd just go with the biggest size available. Well... maybe an 18" bag would've done the job just as nicely, but without being quite so intimidating.
Then came the sprinkles...

And finally, the finished product! And many thanks to Sarah, who helped me out and decorated some of these cute little guys with me!

I must warn you, though, that these are really sweet and rich. I think a normal chocolate cupcake would fare better with all the decorations, and leave the brownie cupcakes to stand on their own merit, with maybe a small swirl of fudge icing for garnish.
Friday, January 8, 2010
These Are Amazing

So, this isn't really a full-blown blog post, although I'll expand on the topic more once I upload the rest of the photos, but I just wanted to let you know how amazing these cupcakes are.
It's turtle brownie mix, with blue buttercream icing and snowflake sprinkles and tiny gingerbread men decorated by Sarah & me.
<3
More adorable pics soon!!
Sunday, January 3, 2010
Ah, the Annual Gingerbread House
 I need to get better at time management. I waited until two days before Christmas to bake the gingerbread house AND I ran out of butter. To be fair, though, it's been a busy holiday season for me, catching up with family and friends, in addition to all the baking and Christmas shopping and being lazy that I've done.
Anyway, despite my lack of time, I think I made a pretty cute little house... and it's actually bigger than the houses I normally make (but smaller than last year's castle). One day I still wanna make a gingerbread Hogwarts, but I have to convince my sister (who's taking an architectural class in school) to make some blueprints with me.
The best pictures I have though are of the house being eaten/destroyed. I think that was more fun than putting it together (especially considering that I was terrified that it wouldn't make it through the night while the royal icing dried).


Monday, January 12, 2009
Martha Stewart Gingerbread Cupcakes Topped with Caravella Limoncello Creamcheese Frosting and Ginger Boy Snaps

Gingerbread cookies, gingerbread cupcakes...too much fun for the Cupcake Queen! And, the Limoncello Cream Cheese Frosting...WOW!

We were even dipping the little gingerbread boys into the frosting! So, first I made the ginger snap cookies! I found the cookies cutters at Michaels!(recipe below)

Then I made the Martha Stewart gingerbread cupcakes! (see recipe below)

Then I made the frosting...with Layla's help, of course! Isn't she adorable!
RECIPES
Ginger Snaps:
3 cups (420 grams) all purpose flour
1/4 teaspoons salt
3/4 teaspoon baking soda
2 teaspoons ground ginger
1 teaspoon ground cinnamon
1/4 teaspoon ground nutmeg
1/4 teaspoon ground cloves
1/2 cup (113 grams) unsalted butter, room temperature
1/2 cup (100 grams) granulated white sugar
1 large egg
2/3 cup (160 ml) unsulphured molasses
In a large bowl, sift or whisk together the flour, salt, baking soda, and spices. Set aside.
In the bowl of your electric mixer (or with a hand mixer), with the paddle attachment, cream the butter and sugar until light and fluffy. Add the egg and molasses and beat until well combined. Gradually add the flour mixture beating until incorporated.
Divide the dough in half, and wrap each half in plastic wrap and refrigerate for at least two hours or overnight.
Preheat oven to 350 degrees F (177 degrees C) and place rack in center of oven. Line 2 baking sheets with parchment paper and set aside while you roll out the dough.
On a lightly floured surface, roll out the dough to a thickness of about 1/4 inch. Use a cookie cutters to cut out the cookies. With an offset spatula lift the cut out cookies onto the baking sheet, placing the cookies about 1 inch (2.54 cm) apart. If you are hanging the cookies or using as gift tags, make a hole at the top of the cookies with a straw or end of a wooden skewer.
Bake for about 6-8 minutes depending on the size of the cookies. Small ones will take about 6 minutes, larger cookies will take about 8 minutes. They are done when they are firm and the edges are just beginning to brown.
Remove the cookies from the oven and cool on the baking sheet for about 1 minutes. When they are firm enough to move, transfer to a wire rack to cool completely.
Martha Stewart Gingerbread Cupcakes:
Makes 12
2 teaspoons baking soda
2 1/2 cups all-purpose flour
2 teaspoons ground ginger
1 1/2 teaspoons ground cinnamon
1/2 teaspoon ground cloves
1/2 teaspoon ground nutmeg
1/2 teaspoon salt
2 teaspoons baking powder
8 tablespoons (1 stick) unsalted butter, room temperature
2/3 cup packed dark-brown sugar
1 cup unsulphered molasses
2 large eggs, room temperature, lightly beaten
1 recipe Butter Glaze
Heat oven to 350 degrees. Line 12 muffin tins with paper baking cups, and set aside. In a small saucepan, bring 1 cup water to a boil. In a bowl, combine boiling water and baking soda; set aside. In a large bowl, sift together flour, ground spices, salt, and baking powder; set aside.
In an electric mixer fitted with the paddle attachment, cream the butter until light. Beat in the brown sugar until fluffy, 1 to 2 minutes. Beat in the molasses, baking-soda mixture, and flour mixture. Beat in the eggs.
Fill the cupcake papers three-quarters full, making sure that the batter is divided evenly. Bake cupcakes until a toothpick inserted in the center of them comes out clean, about 30 minutes. Let cupcakes cool a few minutes, then transfer to a wire rack to cool completely before decorating.
Caravella Limoncello Creamcheese Frosting
1 8-ounce package cream cheese, at room temperature
1/2 stick unsalted butter
4 cups confectioners' sugar
Zest of 1 lemon, grated
1 tablespoon fresh lemon juice
2 tablespoon Caravella Limoncello
With an electric mixer on medium, beat the cream cheese and butter until softened. Slowly add the sugar, zest, juice and Limoncello and beat until creamy, about 3 minutes.
Hope you have a great week!
Rock on, CQ!
Martha Stewart Gingerbread Cupcakes Topped with Caravella Limoncello Creamcheese Frosting and Ginger Boy Snaps
Gingerbread cookies, gingerbread cupcakes...too much fun for the Cupcake Queen! And, the Limoncello Cream Cheese Frosting...WOW!
We were even dipping the little gingerbread boys into the frosting! So, first I made the ginger snap cookies! I found the cookies cutters at Michaels!(recipe below)
Then I made the Martha Stewart gingerbread cupcakes! (see recipe below)
Then I made the frosting...with Layla's help, of course! Isn't she adorable!
RECIPES
Ginger Snaps:
3 cups (420 grams) all purpose flour
1/4 teaspoons salt
3/4 teaspoon baking soda
2 teaspoons ground ginger
1 teaspoon ground cinnamon
1/4 teaspoon ground nutmeg
1/4 teaspoon ground cloves
1/2 cup (113 grams) unsalted butter, room temperature
1/2 cup (100 grams) granulated white sugar
1 large egg
2/3 cup (160 ml) unsulphured molasses
In a large bowl, sift or whisk together the flour, salt, baking soda, and spices. Set aside.
In the bowl of your electric mixer (or with a hand mixer), with the paddle attachment, cream the butter and sugar until light and fluffy. Add the egg and molasses and beat until well combined. Gradually add the flour mixture beating until incorporated.
Divide the dough in half, and wrap each half in plastic wrap and refrigerate for at least two hours or overnight.
Preheat oven to 350 degrees F (177 degrees C) and place rack in center of oven. Line 2 baking sheets with parchment paper and set aside while you roll out the dough.
On a lightly floured surface, roll out the dough to a thickness of about 1/4 inch. Use a cookie cutters to cut out the cookies. With an offset spatula lift the cut out cookies onto the baking sheet, placing the cookies about 1 inch (2.54 cm) apart. If you are hanging the cookies or using as gift tags, make a hole at the top of the cookies with a straw or end of a wooden skewer.
Bake for about 6-8 minutes depending on the size of the cookies. Small ones will take about 6 minutes, larger cookies will take about 8 minutes. They are done when they are firm and the edges are just beginning to brown.
Remove the cookies from the oven and cool on the baking sheet for about 1 minutes. When they are firm enough to move, transfer to a wire rack to cool completely.
Martha Stewart Gingerbread Cupcakes:
Makes 12
2 teaspoons baking soda
2 1/2 cups all-purpose flour
2 teaspoons ground ginger
1 1/2 teaspoons ground cinnamon
1/2 teaspoon ground cloves
1/2 teaspoon ground nutmeg
1/2 teaspoon salt
2 teaspoons baking powder
8 tablespoons (1 stick) unsalted butter, room temperature
2/3 cup packed dark-brown sugar
1 cup unsulphered molasses
2 large eggs, room temperature, lightly beaten
1 recipe Butter Glaze
Heat oven to 350 degrees. Line 12 muffin tins with paper baking cups, and set aside. In a small saucepan, bring 1 cup water to a boil. In a bowl, combine boiling water and baking soda; set aside. In a large bowl, sift together flour, ground spices, salt, and baking powder; set aside.
In an electric mixer fitted with the paddle attachment, cream the butter until light. Beat in the brown sugar until fluffy, 1 to 2 minutes. Beat in the molasses, baking-soda mixture, and flour mixture. Beat in the eggs.
Fill the cupcake papers three-quarters full, making sure that the batter is divided evenly. Bake cupcakes until a toothpick inserted in the center of them comes out clean, about 30 minutes. Let cupcakes cool a few minutes, then transfer to a wire rack to cool completely before decorating.
Caravella Limoncello Creamcheese Frosting
1 8-ounce package cream cheese, at room temperature
1/2 stick unsalted butter
4 cups confectioners' sugar
Zest of 1 lemon, grated
1 tablespoon fresh lemon juice
2 tablespoon Caravella Limoncello
With an electric mixer on medium, beat the cream cheese and butter until softened. Slowly add the sugar, zest, juice and Limoncello and beat until creamy, about 3 minutes.
Hope you have a great week!
Rock on, CQ!
Monday, December 29, 2008
Holiday Cookies
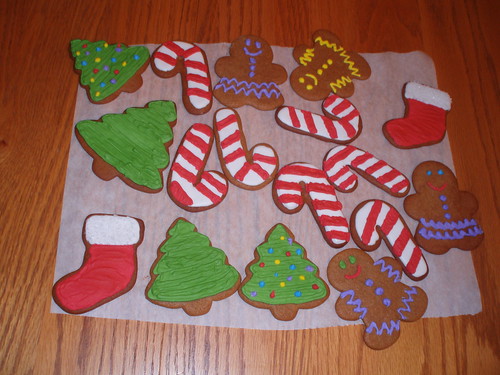
Finally, four days after Christmas, I got around to making my gingerbread cookies. Not just men, mind you, but women and trees and candy canes and stockings, too!
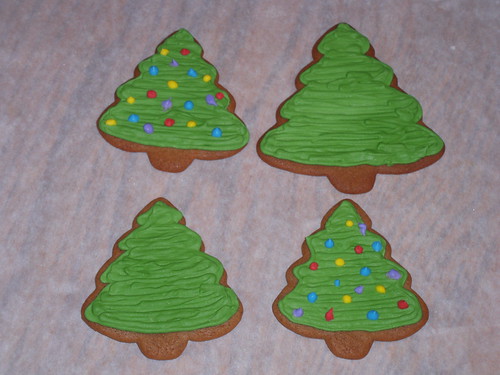
I wanted to make them before Christmas, but with exams and other stressors the week before, and then the sleepover with my friends and the last minute shopping right before Christmas, I just ran out of time! Luckly, though, Christmas doesn't technically end until January 6th, although all the clearance sales at Wal-Mart would tell you otherwise. =/

And not only did I make some delicious/adorable gingerbread cookies, but I also had enough extra royal icing to making some sugar cookies to ring in the new year. These guys I made in time, since 2009 doesn't start until Thursday!
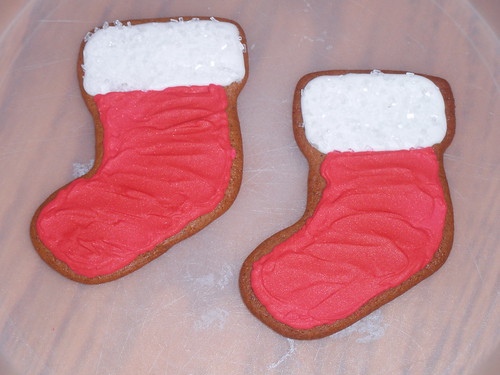
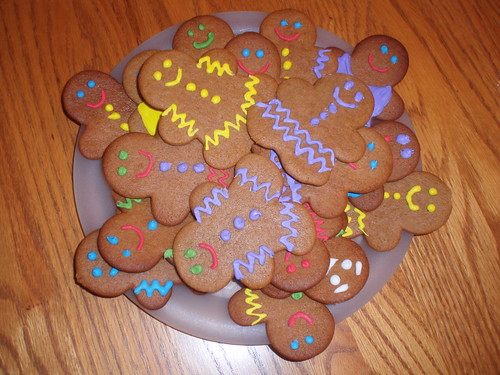
I used the #1, #3, and #5 tips. I think #3 is my favorite to use to ice cookies, but I only have 2 of those and I had a lot more colors and piping bags than just 2. I didn't use the #2 tip because Adam decided that he should wear it as a hat, but now I can't find it... The royal icing (used with Wilton's meringue powder) was thinned to just the right consistency; I don't think I used all 6 tablespoons. That's something you just have to eyeball, though. Smooth, but not too runny, so it doesn't get all over the sides of the cookies. Don't let it be too thick, though, either!

(Don't forget to vote for the Iron Cupcake: Earth challenge!)

Saturday, December 27, 2008
Gingerbread Recipe
I've still got some leftover dough from making the Gingerbread Castle, and I plan to put it to good use by making some cute little gingerbread men and women. Sure, Christmas is technically over, but that won't stop me from still getting into the spirit!
While I'm at work baking and decorating, I thought I'd share my gingerbread recipe, which has served me well for the past three years. I got it from the Food Network's website:
In a large mixing bowl, cream the butter, brown sugar, molasses, cinnamon, ginger, cloves and baking soda together until the mixture is smooth. Blend in the flour and water to make a stiff dough. Chill at least 30 minutes or until firm.
Preheat oven to 375 degrees F.
Cut paper patterns for the gingerbread house:
Two rectangles (figs. A and B), 3 by 5 inches, to make the front and back of the house. Two rectangles (figs. C and D), 3 by 5 1/2 inches for the roof. Two pieces for the ends of the house (figs. E and F), 3 inches wide at the base, 3 inches to the roof line, and slanted to a peak 5 1/2 inches from the bottom. Four smaller rectangles (figs. G, H, I, and J), 1 1/2 by 1 inch for the roof and sides of the entryway. And one piece (fig. K), 2 inches wide at the base, 1 1/2 inches to the roof line, and slanted to a peak 2 1/2 inches from the bottom for the front of the entryway.
Roll gingerbread dough out to edges on a large, rimless cookie sheet. Place paper patterns onto the rolled out dough. With a sharp, straight edged knife, cut around each of the pieces, but leave pieces in place.
Bake at 375 degrees F for about 15 minutes until dough feels firm.
Place patterns on top of the gingerbread again and trim shapes, cutting edges with a straight-edged sharp knife. Leave to cool on baking sheet.
Place royal icing into pastry bag with a writing tip and press out to decorate individual parts of house, piping on decorations, windows, door, etc., as desired. Let dry until hardened.
Glue sides, front and back of house together at corners using royal icing. Place an object against the pieces to prop up until icing is dry (it only takes a few minutes).
Glue the two roof pieces to the pitched roofline of the house. Then, similarly, glue the sides and roof of the entryway together with icing. Attach the entryway to the front of the house.
Continue decorating the house, glueing on gumdrops, licorice and peppermint, as desired.
(**I use Wilton's egg white powder and their royal icing recipe, but this gives you an alternative**)
While I'm at work baking and decorating, I thought I'd share my gingerbread recipe, which has served me well for the past three years. I got it from the Food Network's website:
Ingredients
- 1/2 cup (1 stick) butter, at room temperature
- 1/2 cup dark brown sugar
- 1/4 cup light molasses or dark corn syrup
- 1 tablespoon cinnamon
- 1 tablespoon ground ginger
- 1 1/2 teaspoons ground cloves
- 1 teaspoon baking soda
- 2 cups all-purpose flour
- 2 tablespoons water
For assemblage and decoration:
- Melted white chocolate or Royal Icing (recipe follows)
- Gumdrops, licorice and peppermint, as desired
Directions
Gingerbread House:In a large mixing bowl, cream the butter, brown sugar, molasses, cinnamon, ginger, cloves and baking soda together until the mixture is smooth. Blend in the flour and water to make a stiff dough. Chill at least 30 minutes or until firm.
Preheat oven to 375 degrees F.
Cut paper patterns for the gingerbread house:
Two rectangles (figs. A and B), 3 by 5 inches, to make the front and back of the house. Two rectangles (figs. C and D), 3 by 5 1/2 inches for the roof. Two pieces for the ends of the house (figs. E and F), 3 inches wide at the base, 3 inches to the roof line, and slanted to a peak 5 1/2 inches from the bottom. Four smaller rectangles (figs. G, H, I, and J), 1 1/2 by 1 inch for the roof and sides of the entryway. And one piece (fig. K), 2 inches wide at the base, 1 1/2 inches to the roof line, and slanted to a peak 2 1/2 inches from the bottom for the front of the entryway.
Roll gingerbread dough out to edges on a large, rimless cookie sheet. Place paper patterns onto the rolled out dough. With a sharp, straight edged knife, cut around each of the pieces, but leave pieces in place.
Bake at 375 degrees F for about 15 minutes until dough feels firm.
Place patterns on top of the gingerbread again and trim shapes, cutting edges with a straight-edged sharp knife. Leave to cool on baking sheet.
Place royal icing into pastry bag with a writing tip and press out to decorate individual parts of house, piping on decorations, windows, door, etc., as desired. Let dry until hardened.
Glue sides, front and back of house together at corners using royal icing. Place an object against the pieces to prop up until icing is dry (it only takes a few minutes).
Glue the two roof pieces to the pitched roofline of the house. Then, similarly, glue the sides and roof of the entryway together with icing. Attach the entryway to the front of the house.
Continue decorating the house, glueing on gumdrops, licorice and peppermint, as desired.
Royal Icing:
- 1 pound (3-3/4 cups) powdered sugar, sifted if lumpy
- 1 to 2 large egg whites, or substitute 4 teaspoons packaged egg whites and 1/4 cup water
- 1 teaspoon almond extract, vanilla or lemon juice
(**I use Wilton's egg white powder and their royal icing recipe, but this gives you an alternative**)
Tuesday, December 23, 2008
The Gingerbread Castle


It's based loosely off of the Illuminated Gingerbread Castle, but I decorated it my own way. I was going to make Hogwarts, but I didn't have the time to be architectual about it, so I just made this awesome castle that should belong in Candy Land or something. :-)
Sunday, December 23, 2007
The Gingerbread House
This house was a lot of fun to make. First of all, my sister really baked it and did most of the prep work, I was just there to help her along. I had to watch "Elmo's Christmas Countdown" of course! She did a fantastic job, by the way.
We did all of the decorating together. If you're wondering why some of the house looks a little... odd, that's because five kids ranging from four to sixteen years old all got together and threw candy and icing on gingerbread. (Literally. There was some sprinkle throwing going on... and not from the four-year-old.
Not only was this house fun to make, but also to eat! As we used a homemade recipe, the cookie house was delicious!
Oh, and in my house, they're called Kissies, not Kissables. Don't know why, that's just what Adam calls them. =)


We did all of the decorating together. If you're wondering why some of the house looks a little... odd, that's because five kids ranging from four to sixteen years old all got together and threw candy and icing on gingerbread. (Literally. There was some sprinkle throwing going on... and not from the four-year-old.
Not only was this house fun to make, but also to eat! As we used a homemade recipe, the cookie house was delicious!
Oh, and in my house, they're called Kissies, not Kissables. Don't know why, that's just what Adam calls them. =)


Wednesday, December 12, 2007
Faster than the Gingerbread Man
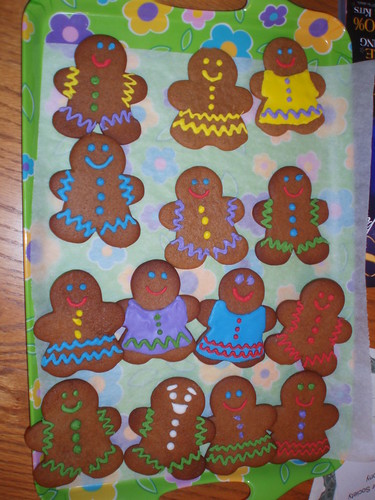
So, I made gingerbread cookies... 34 of them, all with their own adorable personalities. So, here they are...


I learned a lot making these gingerbread guys. Like, how much my quality suffers after about half an hour. I should definitely take breaks more often next time, to keep the cookies looking good and professional. And I also learned that the icing needs to be thin. I need more couplers and round tips (like #2 and #3).
Overall, I learned that cookies are fun! Re-learned, actually. I already knew that! =D


I learned a lot making these gingerbread guys. Like, how much my quality suffers after about half an hour. I should definitely take breaks more often next time, to keep the cookies looking good and professional. And I also learned that the icing needs to be thin. I need more couplers and round tips (like #2 and #3).
Overall, I learned that cookies are fun! Re-learned, actually. I already knew that! =D
Subscribe to:
Posts (Atom)