Showing posts with label key lime. Show all posts

Sunday, August 10, 2008

Saltwater Taffy


Ingredients:
2 cups sugar
1 1/2 cups light corn syrup
1 cup water
1 teaspoon salt
1/2 teaspoon flavored extract (we used key lime extract)
3-4 drops food coloring (optional)

wax paper candy wrappers, about 1 1/4 inch by 3 1/2 inches

Directions:
Prepare two baking sheets by spraying them with nonstick cooking spray or lining them with sili-pats or greasing them with a thin layer of canola oil. Preheat your oven to 200 degrees.

Dissolve the salt in the water. Combine sugar, corn syrup, and salt water in a large saucepan. Bring to a boil, stirring continuously until sugar dissolves. Then continue cooking without stirring until candy reaches 260 degrees(hard-ball stage). If you were to drop a bit of the mixture into a cup of cold water it should form a solid but flexible ball at this stage.

Remove from heat immediately and stir in extract. Pour half (or more than half if you only want a thin stripe of color) of the mixture into a prepared baking sheet and place it in the oven to stay warm. Skip this step if you want solid colored or white candy.

Add food coloring to the remaining candy. Pour the candy out onto a heat-safe cutting board or sili-pat. Allow it to sit until it forms a thin �skin�, just a couple of minutes.

Using a heat-safe scraper or spatula, begin spreading the candy out and pushing it back together. This will allow the mixture to cool to the point where you can pick it up without burning yourself.


Meanwhile, oil your hands with a bit of canola oil. As soon as the candy is cool enough to handle, pull it in long strands then fold the strand back onto itself and repeat, twisting and pulling, until it has a satiny finish and is opaque. Pull into a long rope about 1� thick. Place on the prepared baking sheet on the counter and remove the other batch of taffy from the oven. Make sure you really, really stretch out the candy. The more you stretch, the softer it will be. Candy that is not stretched enough will be hard and difficult to chew.


Repeat the above procedure with this batch. Twist the two strands together until they do not separate.


Pull the twisted candy into long strips, 1/2-inch in diameter, and cut with oiled kitchen shears into pieces about 3 inches long. Alternately, twist into 1 inch wide strips then cut into 1/4 -1/2 inch chunks for coin-shaped taffy. Allow to cool completely before wrapping individually in waxed paper by placing the taffy logs in the middle of the waxed paper then folding it over lengthwise and twisting the ends shut.


Store in an air tight container.


Note: I like to use HFCS-free corn syrup. It is a little more difficult to find (the ubiquitous Karo contains HFCS) but is available at some grocery stores, health food stores and I've actually had great success finding it at Asian grocery stores like H Mart. If you are using conventional corn syrup make sure it does not have vanilla added, I've found nearly all of the Karo other other common brands of light corn syrup have vanilla added.

My thoughts:
Salt water taffy is the quintessential East Coast beach candy. All of the Mid-Atlantic beaches sell a variety of saltwater taffy in stores lining the boardwalk. Its origins are up for debate; use of actual saltwater and flooding come into play but it is generally recognized that Joseph Fralinger in Atlantic City New Jersey is the one who helped make it become as popular as it is today.

At candy shops up and down the East Coast you can find salt water taffy pulling machines hard at work stretching the taffy to a soft consistency but it is possible to make it at home. It involves more pulling than you would think but it is quite easy as long as you get the molten sugar to hard ball stage. I personally don't use a candy thermometer (I just drop it into a cup of cold water to see if it forms a flexible ball) and never have any trouble. If you find that the candy never "sets up" and you can't pull it then start over, it probably wasn't at hard ball stage when you took it off the heat. Luckily, the ingredients are inexpensive and it is quick to get it going again.

I recommend stretching the candy longer than you would think, try a little bit and make sure it is at taffy consistency before wrapping. If not, pull it some more. Three of us were pulling the taffy and some sections were pulled more and thus ended up softer than others. It is better to "over" pull then to not pull enough and end up with hard, sticky candy.

Anyway, it is a fun, surprisingly easy (and non-messy!) treat to make.

Tuesday, March 25, 2008

Key Lime Cream Cheese Frosting


Ingredients:
4 oz cream cheese, at room temperature
1 1/2 cups confectioners' sugar
1 tablespoon key lime juice
food coloring, optional

Directions:
In a large bowl, beat together all ingredients until well blended. Frost on cooled cupcakes or cake.

Yield:
icing for about 12 cupcakes or a single layer cake.

My thoughts:
I still find a few things about key limes amazing. The first thing is that they have become really easy to find in the last couple of years. Secondly, even here in Maryland, far from any place they could possibly grow, they are often cheaper than regular limes. finally, they produce a lot of juice. I got a whole tablespoon of juice from a lime the size of a quarter. This icing has the whole sweet-tart thing going. It's good with other citrus flavors or paired with something more tropical like mango or pineapple. It would probably be good on vanilla or chocolate cupcakes/cake as well.

Sunday, June 24, 2007

Key Lime Frozen Yogurt


Ingredients:
4 cups plain greek style 2% yogurt*
3/4 cup sugar
zest of 2 key limes
1 tablespoon key lime juice

Directions:
Mix together all of the ingredients until the sugar dissolves. Pour into a ice cream maker and churn until thick, about 30 minutes. Freeze in a freeze safer container or serve immediately for a more "soft serve" style treat.


*I've heard you can make greek-style yogurt-which is thick like sour cream- by straining a double amount of regular yogurt overnight but I haven't tried it. You could also use full fat greek style yogurt here but 2% makes an extremely rich and creamy frozen yogurt and has a fraction of the total fat content.


My thoughts:
Due to some quirk in the universe, I often am able to find key limes (at Trader Joe's, Whole Foods or H Mart) for less than the the cost of the more common Persian limes. Normally I just use them as I would a regular lime, but some times their slightly tarter flavor needs a place to shine. I've made a myriad of key lime recipes: the ubiquitous pies (both with and without coconut), sherbet, fruit salads, and even bread and curd but I think one of my favorite things to make with key limes is frozen yogurt. Homemade frozen yogurt is a thousand times better than what you can get at a store: the perfect balance of creamy and tangy and the texture is phenomenal. The tart key limes really bring out the tartness in the yogurt without being over powering. I also think regular limes or even oranges or tangerines would be a good substitute for the key limes if you don't have my luck in finding them.

Note: a couple of people have emailed me about the straining the yogurt option saying that it was a cheaper alternative to the greek yogurt that works just as well. Since I haven't tried it, I don't know if it works just as well. However, I am not entirely convinced that it is cheaper to strain your own. I bought (store brand) greek-style yogurt for $3 for 16 oz, so the total for the recipe was $6. A 32 oz container of regular plain (store brand) yogurt was $3.50. Since you'd have to buy twice the amount of regular yogurt to make faux greek-style yogurt, your total for this recipe would be $7. This means that straining the yogurt yourself is both more expensive and more work. I'd only substitute strained yogurt if I could no longer find the greek-style. Using the greek-style yogurt I went from opening the container to eating frozen yogurt in less than 40 minutes and saved a dollar. Of course, prices might vary depending where you live, but I did do my price comparisons at two national chains.

Tuesday, February 27, 2007

Blueberry Key Lime Sherbet


Ingredients:
2 1/4 cups blueberries
2 cups buttermilk
1 cup sugar (if berries are overly tart, add more to taste)
2 tablespoons key lime juice
1 tablespoon key lime zest

Directions:
Place sugar and blueberries in a medium sized bowl. Mash with a potato masher until until the blueberries are completely mashed, the mixture is thick and the blueberry skins are empty. Drain through a sieve into a large bowl, pressing with a spoon to get all of the juice/fruit out. Discard leftover skins. Stir in the buttermilk, lime juice and zest. Pour into a ice cream maker and churn until thick and frozen, about 20-30 minutes. Pour into a freezer safe container and freezer overnight. Serve.


My thoughts:

Blueberries were on sale recently and I wanted to do something with them that didn't involve baking. I love blueberry muffins and buckles, but I wanted to do something totally different. Something frozen seemed to be an easy answer. I had never made a sherbet* before before but thought I'd give it a try. Sherbets are generally made with milk, but we had some buttermilk on hand so I thought I'd use that instead and see if it worked. I wasn't sure how buttermilk would freeze, but it actually froze really quickly and didn't separate at all. The results were marvelous, the buttermilk really gives it a tangy richness that really compliments the blueberries. Buttermilk (despite the connotations of the name) is very low in fat so this is actually a quite healthy dessert. I used key limes, and I loved the flavor they brought to the sherbet, but regular (Persian) limes would be a logical substitution.


*I just looked up sherbet to confirm what makes it different from a sorbet (sorbets are made with water and do not contain any sort of dairy product) and it turns out that in the UK, a sherbet is something very different- a sort of fizzy powdered candy. In the US, it is sort of like low fat fruit flavored ice cream that is made with milk instead of cream.

Monday, February 12, 2007

Kiwi Kumquat Salad with Key Lime Syrup


Ingredients:
6 kiwi, sliced
6 kumquats, sliced or halved
1/2 cup water
1/2 cup sugar
1 tablespoon key lime juice
1/2 teaspoon key lime zest

Directions:

In a saucepan, bring water, sugar, juice and zest to a boil. Stir until completely dissolved and syrup has thickened. Meanwhile, arrange fruit in a bowl. Cool the syrup completely then pour over fruit. Pour any leftover syrup into a clean jar and cap tightly. Store leftover syrup in the refrigerator.


My thoughts:
I made this little fruit salad for breakfast this morning. It couldn't be simpler. I enjoyed the simple kiwi-kumquat combo but I bet it would be divine with some added chunks of citrus. Maybe blood oranges?

Tuesday, August 8, 2006

Key Lime Curd


Ingredients:
3 eggs
6 tablespoons butter
1/2 cup sugar
2/3 cup fresh key lime juice*
1 teaspoons key lime zest

Directions:
Over low heat, melt the butter in a saucepan. Add the remaining ingredients and whisk continuously for about 8-10 minutes or until it forms a custard. Allow to cool then pour into a jar and refrigerate. The curd will thicken considerably as it cools.


*Persian lime juice will work just as well but the resulting curd will be a tad sweeter.
My thoughts:
Every time I see key limes in the store I can't resist buying them. It's a sickness, really. This time it was a bag of about 50 for $1.60 and I couldn't turn down that kind of a deal-normally a much smaller bag runs about $4-5. Anyway, I didn't want to make another pie so we had been using the key limes in place of usual limes (even in our chicken salad) until I thought of making key lime curd. I'd never made any sort of curd before but I had seen a pricey jar of lemon curd in the store and thought it looked like something I could make. It was much easier and faster than expected, it was almost magical how it went from being liquid to custard in just a few minutes. I made this recipe a little lighter than most lime curd recipes which frequently call for 3 or 4 whole eggs plus additional yolks. I think it's better for it, any more eggs and I think the eggy flavor would have over-powered the delicate tartness of the key limes. I can't wait to make some thing with it, it already tastes delicious.

Thursday, June 15, 2006

Key Lime & Apple Bread


Ingredients:

1 2/3 cup flour
2/3 cup sugar
� cup shredded Granny Smith apple (skin on)
2 eggs, at room temperature
5 tablespoons butter, at room temperature
3 tablespoons key lime juice*
2 tablespoons milk
1 tablespoon key lime zest
1 teaspoon baking powder
� teaspoon baking soda
� teaspoon salt

Directions:

Preheat oven to 350. Grease and flour or spray (with baking spray with flour) 1 9x5x3 loaf pan. In a medium mixing bowl, combine sugar, zest, lime juice, egg and butter until fluffy. Add the milk and apple, mix until thoroughly incorporated. Add flour, baking soda, baking powder, and salt. Mix thoroughly. The batter will be lumpy from the apple. Pour into prepared loaf pan. Bake 30-45** minutes or until a toothpick inserted into the center comes out clean. Cool in pan about 5 minutes then invert to a wire rack. Slice and serve when cooled to your liking.

*"regular" lime juce and zest would work just as well.

**It really depends on how moist your apple is, the juicer the apple, the longer it will take the bake. If it takes a really long time (over 45 minutes) or starts to get really brown on the edges while still raw in the middle, drop the temperature down to 300 and continue to bake.

My thoughts:
Why key lime and apple you might ask. Why not key lime and something more tropical? The truth is I needed to make something to use up the key limes I had left over from making the coconut key lime pie. We are leaving tonight to go to NYC for weekend to attend the Renegade Craft Fair and I just knew the limes would go bad while we were away. I had one apple left in the fruit bowl so I used that up too. That being said, it really is a good combination, I was pleased with how well the flavors of the tart key limes and the tart apple complemented each other. As a bonus this recipe also came together very quickly. I was shredding the apple while I was creaming the butter and sugar (yay stand mixers!) and was able to get the whole thing in the oven in about 12 minutes. I plan on wrapping the rest up and taking it with us for tomorrow's breakfast.

Wednesday, June 14, 2006

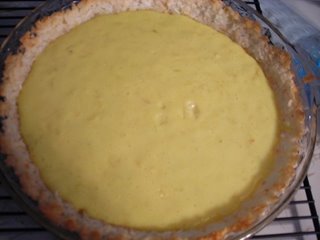
Coconut Key Lime Pie


Ingredients:
14 oz can of sweetened condensed milk (fat free is fine)
3 egg yolks
2/3 cup toasted coconut
1/3 cup key lime juice*
2 1/2 teaspoons key lime zest
9 inch round coconut crust or graham cracker crust

Directions:
Preheat oven to 300. In a large mixing bowl, using your electric mixer, beat the egg yolks, lime juice and zest until the eggs are creamy. Slowly add condensed milk and toasted coconut and mix until well combined. Pour into crust and bake 15 minutes or until the pie is "set" and no longer feels liquid to the touch. Cool on wire rack, refrigerate.


*Note: For an authentic pie, you need the juice of fresh key limes. Using a juicer is the most efficient way to extract the most amount of juice from tiny key limes limes. If you have to use bottled juice, make sure it is from actual key limes (the juice will be a pale yellow) and not just (Persian) lime juice with citric acid added to make it tart. Of course, you could just use regular lime juice but then it won't be a "key lime pie".

My thoughts:
I am lucky to live near several great grocery stores. This results in my having access to fresh key limes several times a year. My husband loves key lime pie so I came up with this recipe for him. I basically used the same recipe I usually use to make key lime pie and added coconut to it. I also baked it in a homemade coconut pie crust instead of a graham cracker crust. I bet some people reading this will think that it would be coconut overload to have coconut in the pie and into the crust, but I assure you, it isn't. The amount of coconut in the pie is just enough that it ties the flavors of the pie together.

Wednesday, December 28, 2005

Key Lime Pie

Key Lime Pie


Ingredients:
14 oz can of sweetened condensed milk (fat free is fine)
3 egg yolks
1/3 cup key lime juice*
2 1/2 teaspoons key lime zest
9 inch round graham cracker crust

Directions:
Preheat oven to 300. In a large mixing bowl, using your electric mixer, beat the egg yolks and zest until the eggs are creamy. Slowly add condensed milk and mix until well combined. Add key lime juice and mix to combine thoroughly. Pour into crust and bake 15 minutes or until the pie is "set" and no longer feels liquid to the touch. Cool on wire rack, refrigerate.


*Note: For an authentic pie, you need the juice of fresh key limes. Using a juicer is the most efficient way to extract the most amount of juice from tiny key limes limes. I was able to yield 1/3 cup of juice from only 10 (2 inch diameter) limes using my juicer. If you have to use bottled juice, make sure it is from actual key limes (the juice will be a pale yellow) and not just (Persian) lime juice with citric acid added to make it tart.


My thoughts:
Who knew key lime pie was so easy to make? It's one of my husband's favorites so when I saw fresh key limes in the store, I couldn't resist. The bag came with a recipe, but I upped the amount of zest and juice it called for to yield a more tart pie. It came out as well if not better than the pies I've had from places that specialize in key lime pies.