Showing posts with label cookie cake. Show all posts

Monday, March 16, 2009

Zebra Cake, II


This is last weekend's cookie cake for my sister's friend's 15th birthday.  I changed the design up a little bit from the last one, and I think it looks awesome.  (I might be a little biased, but the birthday girl and her mom liked it too.)

Plus, the said it tasted great, which is the main purpose of the cake anyway.

In other cake decorating news, I have recently been to both Michael's and the "local" cake decorating store.  At Michael's, I bought some tips and some various cookie decorating equipment, like squeeze bottles.  The "local" cake store was a little more interesting:  I bought a tip saver and a lily flower nail, which will come in handy when Easter is here.  I say that the store is "local" because it's really 45 minutes away-- not really in the local area at all.  However, it's only about a minute from the dentist's office, and Mom and I were able to stop by and browse before my appointment.

This week I've got to make the Spanish Honor Society Induction Cake (the NHS cake fell through because I didn't have a pan big enough to make a cake for 100 people) and Katie's birthday cake.

If you haven't been able to tell, with my lack of blogging recently, March has been a very busy month.  And it's only half over!  I will try my hardest to stay on top of things, though, which includes blogging.  Oh, and Happy St. Patrick's Day to everyone!

Wednesday, March 4, 2009

The Horse in Striped Pajamas, Part I


So I was finally able to decorate that cookie cake that I made on Saturday.  Of course, this is just the practice cake, so I hope that the finally version will look a little more cleaned-up than this cake.

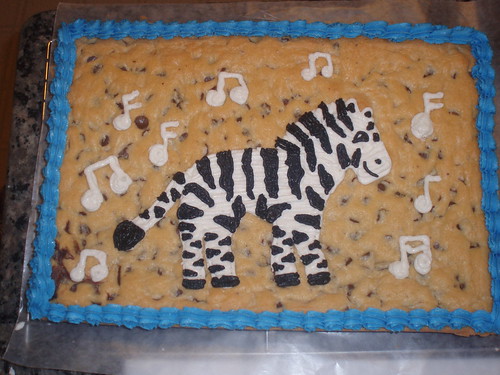
Let me begin with the zebra, since he is the center piece of the cake (cookie).  I had a wax paper cutout that was traced from a computer printout (I just googled "zebra coloring page"), and traced it onto the cookie (cake) with the white buttercream.  When I lifted the wax paper up, some of the outline came with it, but fortunately, enough of the outline was preserved that I just free-handed it.  I piped in all of the white first with a #5 tip (I think next time I'll use a #3 or #2 for the outline) and then I free-handed, based on the picture, all of the stripes, facial features, and tail.

I used a #3 tip for the black detail, and next time I'll use a #2.  I just didn't have the control that I wanted with a bigger tip.  I might even use a #1, but that tip is so small, so probably not.  Also, the black buttercream was too thick (I added cocoa powder to dark the icing up), so for the "real" cake, I'll make sure it's thinned down.

(A helpful hint about making black buttercream:  I always add cocoa powder, usually dark, to the buttercream before I add the black gel, and a little bit of liquid.  And I mix it until it's a dark gray color.  If you're not sure if your gray is dark enough, take a little bit and hold it up to something white, like a napkin.  Even if the icing seems too light while you're mixing it, when it's compared to white, it looks black enough.)

The musical notes were made with a #5 tip, which I will certainly not do next time.  Probably a #3 tip would be best, although I'll do a few practice notes first this weekend when I make the real cake.  They will also be blue, not white, but I was just too lazy to change out my tips.  Also, I'll put "Happy Birthday" on the real cake, but as this practice cake is merely for my own family's enjoyment, so I didn't worry about the words.

I would really like to do the star/shell border with a #32 tip, instead of the #21 that I used this time, but unfortunately, it got smushed.  I'm not sure what happened, but when I opened my Box O' Cake Decorating Supplies, I was aghast to see the #32 star tip all dented in.  I know Wilton makes a tool to help fix a problem like this, but I am not currently in possession of that aforementioned tool.

I'm really excited about making the real deal this weekend.  I got the practice cake done, so hopefully that means I got all of the mistakes out of the way.  The only problem is that I have to get the rest of this week over with before I can enjoy this weekend and the cake.  I'm getting my wisdom teeth out tomorrow. :(

It's definitely a busy month for baking, because next weekend I'm making another anniversary cake, and the weekend after that is my sister's birthday, and between those 2 cakes, I'm making a third cake for the Sociedad Honoraria Hispanica induction ceremony, so that should be fun.  And definitely busy!

Saturday, February 28, 2009

Chocolate Chip Cookie Cake Recipe


I got this recipe from recipezaar.com thanks to April J.


Ingredients
  • 1 cup butter
  • 1/2 cup sugar
  • 2/3 cup brown sugar
  • 2 eggs
  • 1 teaspoon vanilla
  • 2 cups flour, plus
  • 4 tablespoons flour
  • 1 teaspoon salt
  • 1 teaspoon cream of tartar
  • 1 teaspoon baking soda
  • 2 cups semi-sweet chocolate chips

Directions
  1. Beat butter and sugars together.
  2. Add eggs and vanilla.
  3. Mix flour, salt, baking soda, and cream of tartar.
  4. Add dry ingredients to the batter and mix until well blended.
  5. Stir in chocolate chips.
  6. Spread dough into a 15 1/2 inch round pan.
  7. Bake for 20 minutes at 350 degrees.
 This is a tried-and-true recipe which literally just came out of the oven.  I'm not sure how it tastes yet, but if it's anything like the cookie dough that I licked off the spatula, then it's delicious!

Some observations that I would like to add, in case you'd like to try this recipe:
  • When I make cookies (or pretty much anything, for that matter), I always bring the refrigerated stuff to room temperature first, unless otherwise noted in the recipe.  In this case, it means that I left the eggs and butter out on the counter for a while to warm up a bit.
  • I used a 9x13" cake pan, and the cookie cake turned out really thick-- much thicker than what you normally see at the supermarket.  This is just a practice cake for something I'm making next week, but I think I'll use my jelly roll pan, or use less dough.  I don't have the exact dimentions for the jelly roll pan, but it's bigger than the pan I used this time.
  • I sprayed the pan with Pam for Baking (which smells really good, by the way) before I put the dough in it.
  • The dough is really sticky, so I just greased up my hands (clean, washed hands, of course) and used my hands to spread the dough into the pan before I baked it.  It doesn't have to be completely flat either, just try to get it as level as possible.  No need for perfectionism :)
  • When baking, the dough did rise up a little along the edges more so than in the middle.  Just thought I'd make that observation, although it was just a little thing; no big deal.
  • I baked for 25 minutes, instead of 20, because I like my cookies to be golden brown.  I think they could've gone for another few minutes, but keep an eye out so that they don't burn if you choose to go this route.
  • After taking the cake out of the oven, I let it cool for 10 minutes, ran a knife around the pan's edges, and flipped the cake out onto a cooling rack covered with wax paper.
Personally, I love cookie cake, and I hope that I can recreate that cookie goodness that comes from Publix or Kroger and make an equally (or more) delicious home-made version.  I'll let you know how the rest of the cookie cake testing goes, and until then, maybe you can try your hand at this yummy recipe. :)

(That's a big cookie!)